
Tutorial: How to quickly reframe a
360 video with Insta360 Studio
Written by Axel Busch on 12 December 2023
Insta360 Studio 2023 version 4.9.0

“Reframing” is the process of creating a regular video from a spherical (360 degree) video by choosing a smaller area of the 360 video. You can choose the size, direction and angle freely and change this over time, like panning or zooming in or out.
The advantage of having a 360 spherical video source is that it contains everything that was happening around the camera at the time, and that allows you to choose what to show during the editing process. Because the 360 video is fully stabilized, the result is a super smooth video that includes all the highlights. You’ll never miss a shot, even if the action happened behind you.
Because the Insta360 One RS 1-inch 360 Edition camera records two 200-degree views back-to-back, a stitching software is needed to prepare the spherical or reframed video. This software is Insta360 Studio, and it is provided for free by Insta360 for Windows and Mac (versions for iOS and Android are also available, but not covered in this guide).

Overview of Insta360 Studio 2023 user interface
For this tuturial we used video recorded with the Insta360 One RS 1-inch 360 Edition camera inside our Mantis RS360 housing
Step 1: Import files into Insta360 Studio

You can import files directly from the camera, from the camera’s memory card, or after copying them to your computer or USB drive. We strongly recommend to copy all files onto a backup drive before editing or recording any further videos.
In order to edit straight from the camera you have to enable the camera’s U-Disk mode and connect the camera via USB-C cable to your computer.
Remove the mSD card from the camera and connect it using a card-reader. Alternative, you can copy the videos straight from the camera in this way:
On the camera, got to: Settings -> General -> USB and enble U-Disk mode
Connect the camera with a USB Type C cable to the computer.
Start Insta360 Studio.
Insta360 Studio will offer to import the files automatically.
You may choose Later, Select Files, Import all.
You can also import files by clicking on “Open Files”, or dragging & dropping files into the left panel.
Step 2: Adjust stitching parameters
Adjust Stabilization, Stitching, and Colour with the panels on the right hand side of Insta360 Studio
The first step after choosing your recording is to set up the correct Stabilization, Stitching, and Media Processing settings using the side panels on the right.
Move the playhead marker on the timeline until you find a frame that is suitable for color correction.
Frames that show sand, faces, or your primary subject are usually good choices.Using the sidebar panels on the right side of Insta360 Studio configure the following settings:
Stabilization panel:
Enable "FlowState Stabilization"
Enable "Direction Lock"
Stitching panel:
Enable “Optical Flow Stitching”
Enable “Chromatic Calibration”
Stitching Calibration:
Do not click the "Calibrate" button, the algorithm is not optimized for the housing.
Click the "Reset" button if it is enabled.
Media Processing panel:
Enable "AquaVision 2.0"
Set "Hue" and "Strength".
Often a Strength setting between 30 and 70 works well.
Avoid strong cyan/purple water.
Too much strength will produce strong contrasts and excessive blue banding.

Step 3: Set the beginning and end of the clip

Adjust the start and end of the clip using trim markers
The next step is to choose the start and end of the clip you would like to export. Often you just want to remove the first and last few seconds, or maybe you want to export only a 10 second clip showing a particular highlight.
Follow these steps to set a start and end for your video:
Click on the timeline to place the play head where you would like the clip to start.
Press “Set Trim Start” button.
Place the play head where you would like the clip to end.
Press the “Set Trim End” button.
When you export the video, it will only export the frames between the Trim Start and Trim End markers.
Note: Once the Trim Start and Trim End markers are set, you cannot place them outside of the selected segment using the buttons. But you can click-hold onto the Trim Start or Trim End marker and drag them along the timeline to increase or shorten the segment.
Step 4: Choose what to show
Change between different views in one clip by setting Keyframes
Really the best part about recording in 360 is that you get to decide afterwards what to show. Did you see that shark passing by behind you? No, but the 360 camera recorded it anyway!
You can simply change the view by clicking inside the video view and then dragging the view around. The mouse wheel (our trackpad gesture) lets you zoom in and out. This sets the view for the whole clip.
You can also change between different views and zoom levels by placing Keyframes using the Keyframe button (+). For each Keyframe, Insta360 Studio allows you to freely set direction, zoom, angle and then automatically creates a smooth transitions between the different Keyframes in your timeline.
Here’s how to use Keyframes to change between views:
Activate Reframe view (The ‘Edit’ type icon above the video)
Click on the timeline to place the play head where you would like to change the view.
Klick the “Set Keyframe” button (+).
In the Keyframe panel that shows, set your desired view, zoom, and orientation.
Insta360 Studio provides 5 sliders (pan, tilt, roll, fov, distortion) and 9 presets (Default, Crystal Ball, Tiny Planet, Natural, Ultra Wide, Wide, Linear, Linear+, Narrow).
A Keyframe with “Tiny Planet” or “Crystal Ball” preset is a popular way to transition between different views or to start or end a clip.
You can also use the Deep Track functionality to automatically track a subject using AI. Simply click on the Deep Track button [+] and follow the instructions.
Insta360 Studio can automatically adjust the view to track a subject using its “Deep Track” AI functionality.
Step 5: Export
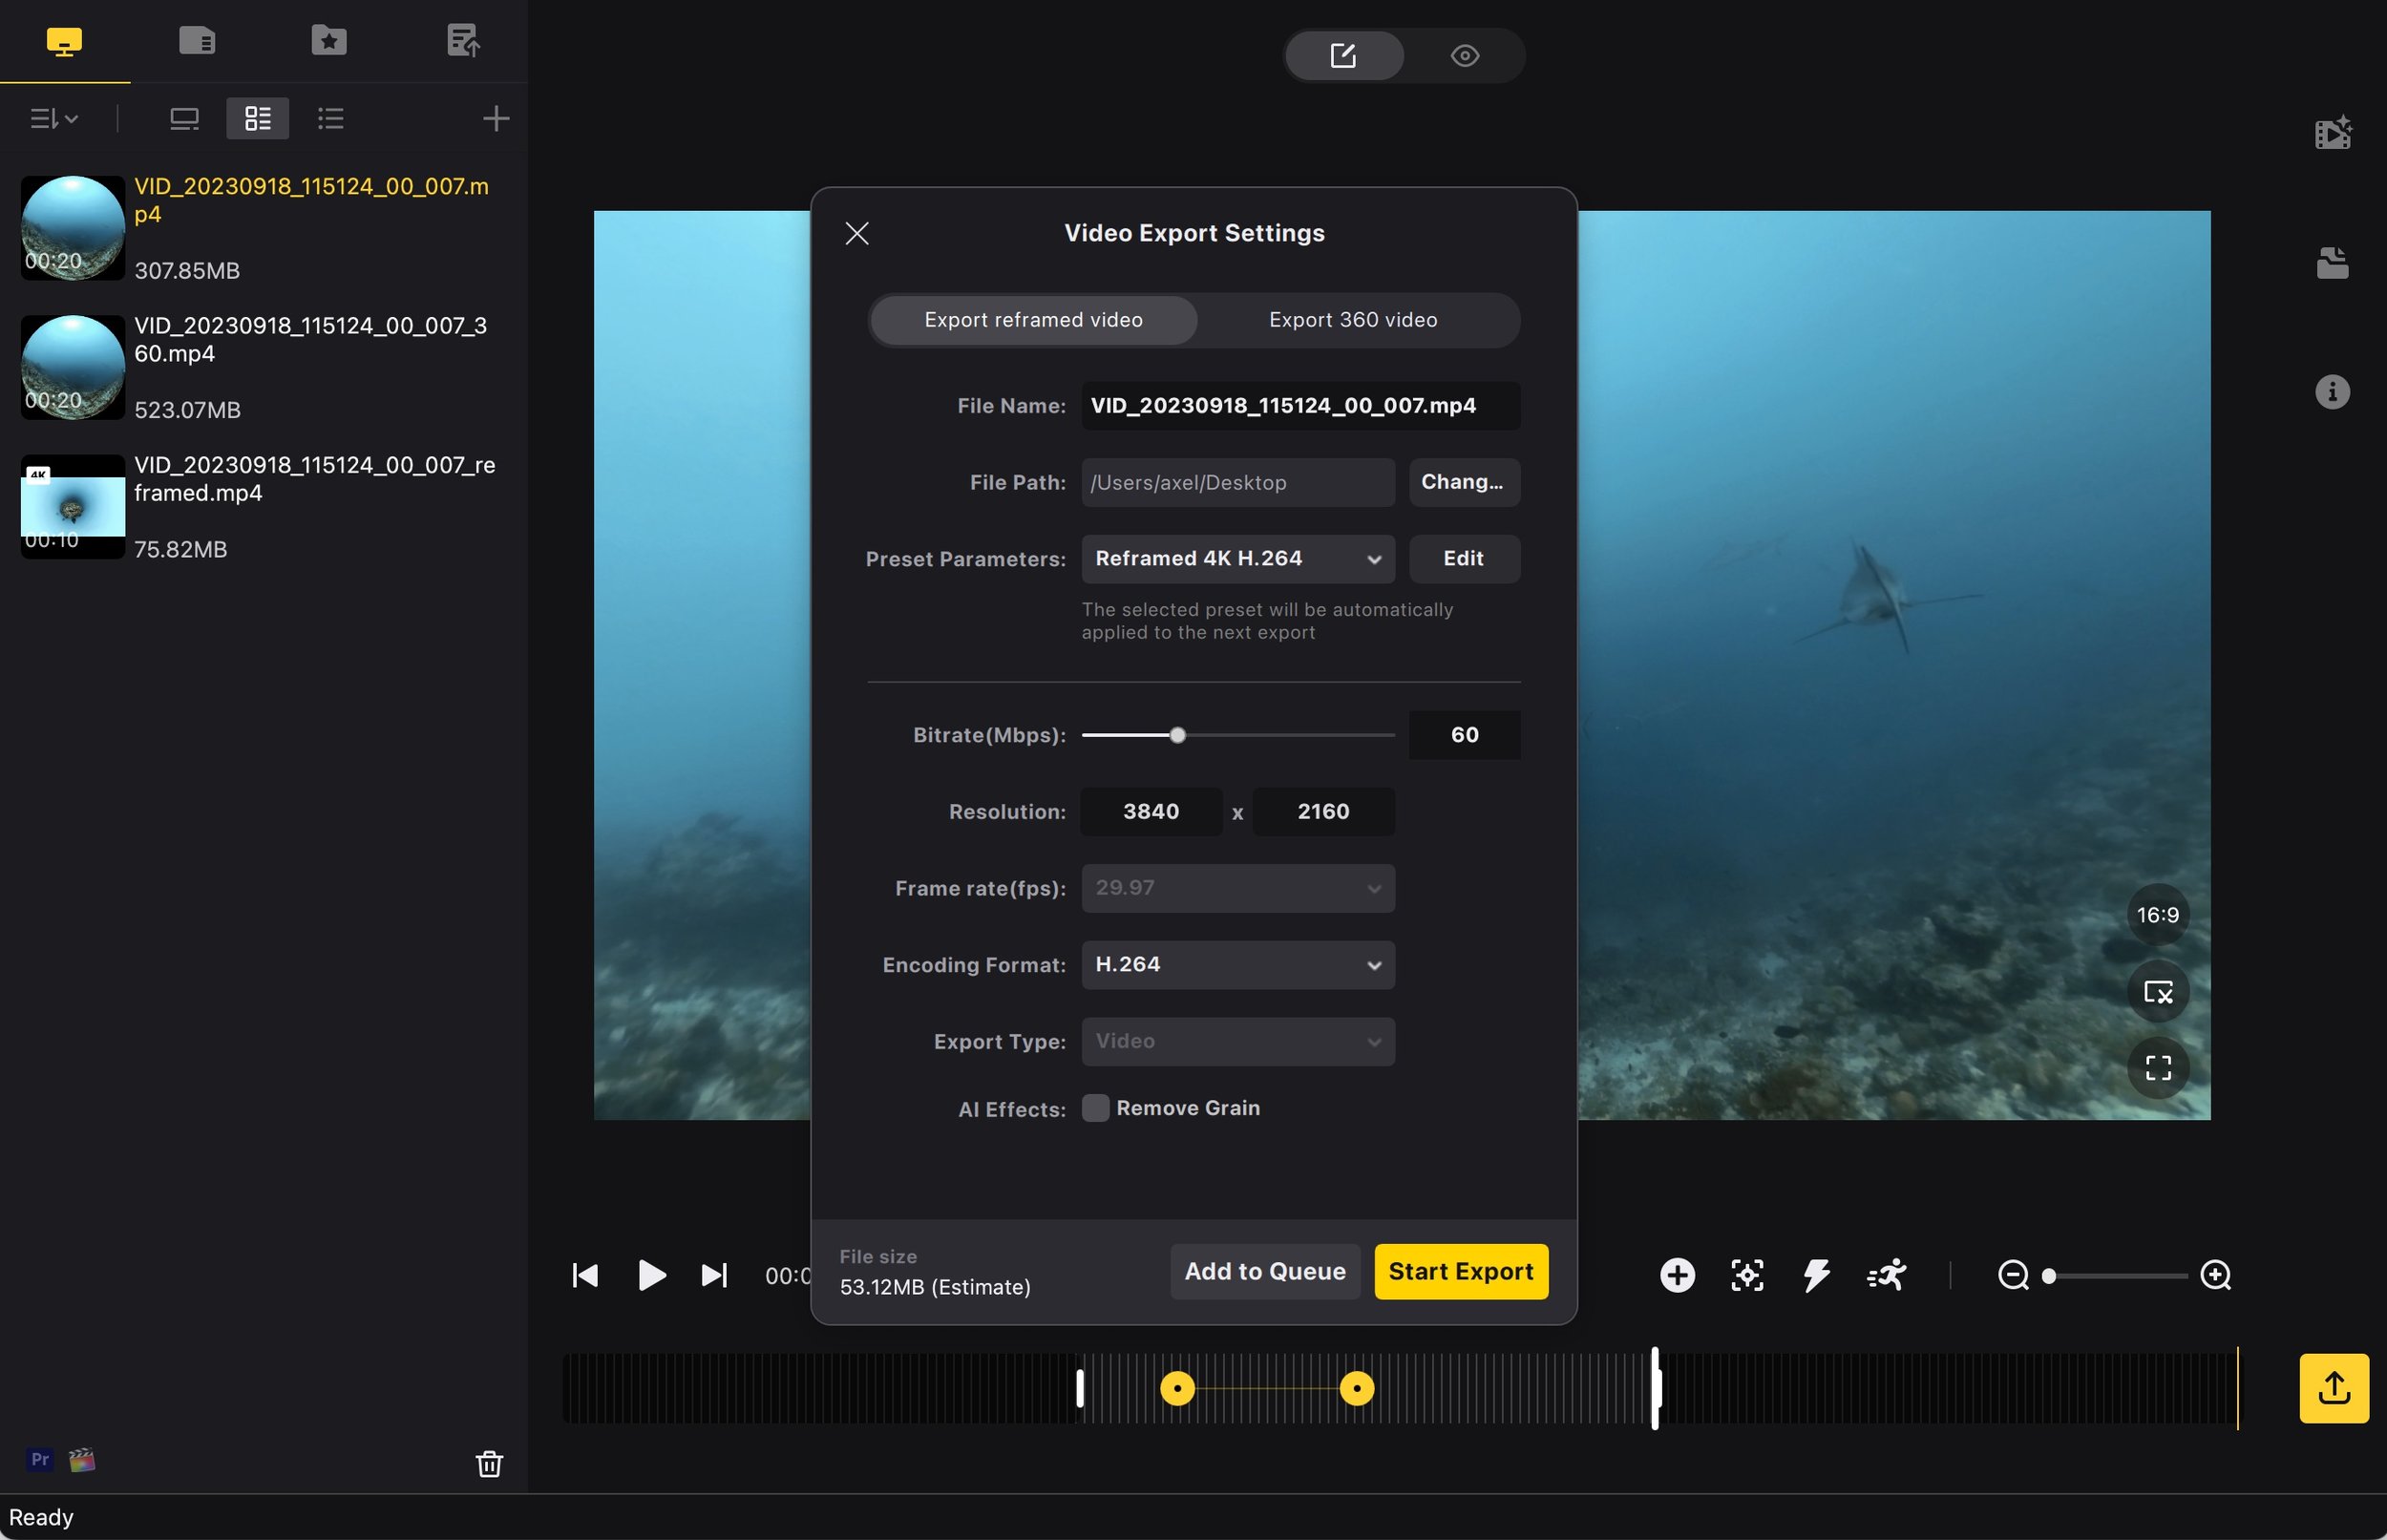
During the export process, Insta360 Studio applies your changes to each frame and renders a video file at the desired resolution. The default export settings are usually just fine, but they can be optimized for certain use cases (phone, upload, edit further).
Resolution: 1920x1080 is the default and matches approximately the resolution of the view of the 6K 360 video that is used for the “Default” settings. However, if you choose a wider field of view, you leave pixels unused. If you want to get the maximum quality it can be better to export in 3840x1920 instead, and apply some sharpening in the video editing software.
Click “Start Export”
Adjust export settings
Standard HD:
Bitrate: 25
Resolution: 1920 x 1080
Encoding: H.264 or H.265
H.264 is better for further editing and streaming
H.265 is a smaller file size
Export Type: Video
Up-scaled for further post production:
Bitrate: 60
Resolution: 3840 x 2160
Encoding: H.264
H.264 is better for further editing and streaming
H.265 is a smaller file size
Export Type: Video
Optional: Save parameters as "Reframed 4K"
That’s it!
Currently Insta360 Studio does not have the ability to string several segments into one video. You can only export one segment at a time, and then need a video editing software to combine several clips into one video and add titles and transitions.
Popular choices for video editing software include Final Cut Pro, Premiere Pro, DaVinci Resolve, iMovie, Kdenlive, OpenShot, Shotcut or VideoStudio.
Background info: files and projects
Here’s some technical information on how the camera stores recordings and how you can backup your edits.
About Insta360 One RS 1-inch 360 Edition recordings:
Each recording with the Insta360 ONE RS 1-inch 360 Edition consists of 3 files:
VID_(date)_(time)_00_(indexnumber).insv
Back direction (display not visible) with full resolution recording, audio, gyro data, model, serial number.VID_(date)_(time)_10_(indexnumber).insv
Front direction (display visible) with full resolution recording, audio.LRV_(date)_(time)_11_(indexnumber).insv
Back+Front side-by-side low resolution recording, audio, gyro data
The LRV_ file is needed for editing with the mobile App. When editing on Windows or Mac the LRV_ file provides previews, but is not strictly needed.
Although the files have the “.insv” file ending, they are normal MP4 video files (with additional metadata) and can be played by any video player program that supports MP4 files. For example, you can drag & drop them into VLC as they are. For other programs you might have to rename them to have the .mp4 file ending.
How to copy and back up Insta360 Studio projects:
The Insta360 Studio project files with the editing settings are stored on your computer and can be backed-up and copied to another machine.
On macOS and Windows the project folders are stored in the subfolder Documents/insta360/Studio/Project/ of the user’s home folder.
The project file is named like VID_(date)_(time)_00_(number).insv.insprj, e.g. VID_20230624_102721_00_009.insv.insprj
You can copy the project file to the same folder as the recordings and then transfer them together to a different computer.
To open a copied project, simply double-click on the .insprj file to open the project in Insta360 Studio. The .insprj has to be in the same folder as the two .insv files.
More from the Mantis Sub Academy.
With the Mantis Sub Academy we want to provide a set of free resources to help you getting started with creating 360/VR content. Here are some more articles: